How do I stop Word saving to OneDrive?
Not fussed about using OneDrive? Or rather just prefer that your Word files don’t get saved to it by default? Well, here’s how to stop Word from saving to OneDrive by default.
How to stop Word saving to OneDrive
Time needed: 2 minutes
This is how to stop recent versions of Word (we’ve tested this back to Word 2016) on the PC defaulting to OneDrive every time you hit the Save button.
- Open Word’s settings
Open Word, and create a new document. Click on the File menu in the top left-hand corner and then click on Options in the bottom-left corner of the window.
- Choose Save To Computer
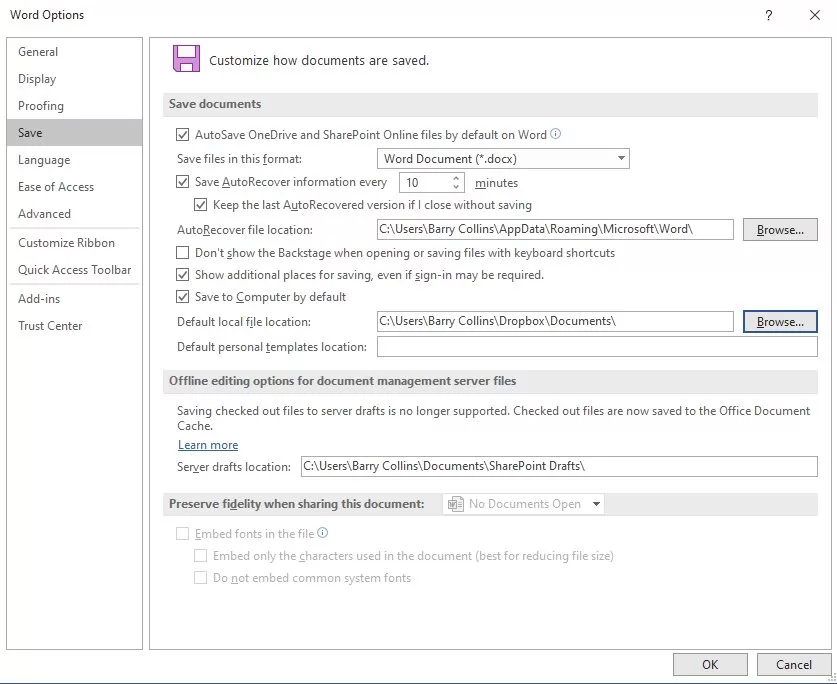
Click Save from the sidebar on the left-hand side of the window that appears. Then, in the right-hand pane, tick the option that says “Save to Computer by default”.
- Choose a new destination folder
You now need to tell Word which folder you’d like to save documents in by default. Hit the Browse button next to “Default local file location” and navigate to the folder that you wish to use. I’ve chosen a folder in my Dropbox, which I find far more reliable and flexible as a cloud service than OneDrive. Your screen should look something like this now:
- Finish and test
Now click OK at the bottom of the screen and test whether it’s working by typing a few random words and hitting Save. Hopefully, it should default to your new location.
More explainers
NEXT UP

What is the one key thing employees expect from technology when they start their working day?
Regardless of industry, working location or applications used, employees should expect technology to just work.

Let the games begin: Paris Olympics puts AI to the test
The Paris Olympics will drench the French city in AI – but care must be taken to avoid any harm.

Jochem van der Veer, Co-Founder and CEO of TheyDo: “In this world of AI, we need to remember to think humanely”
We interview Jochem van der Veer, Co-Founder and CEO of TheyDo, who shares many excellent insights into how businesses can make their customers happy
