
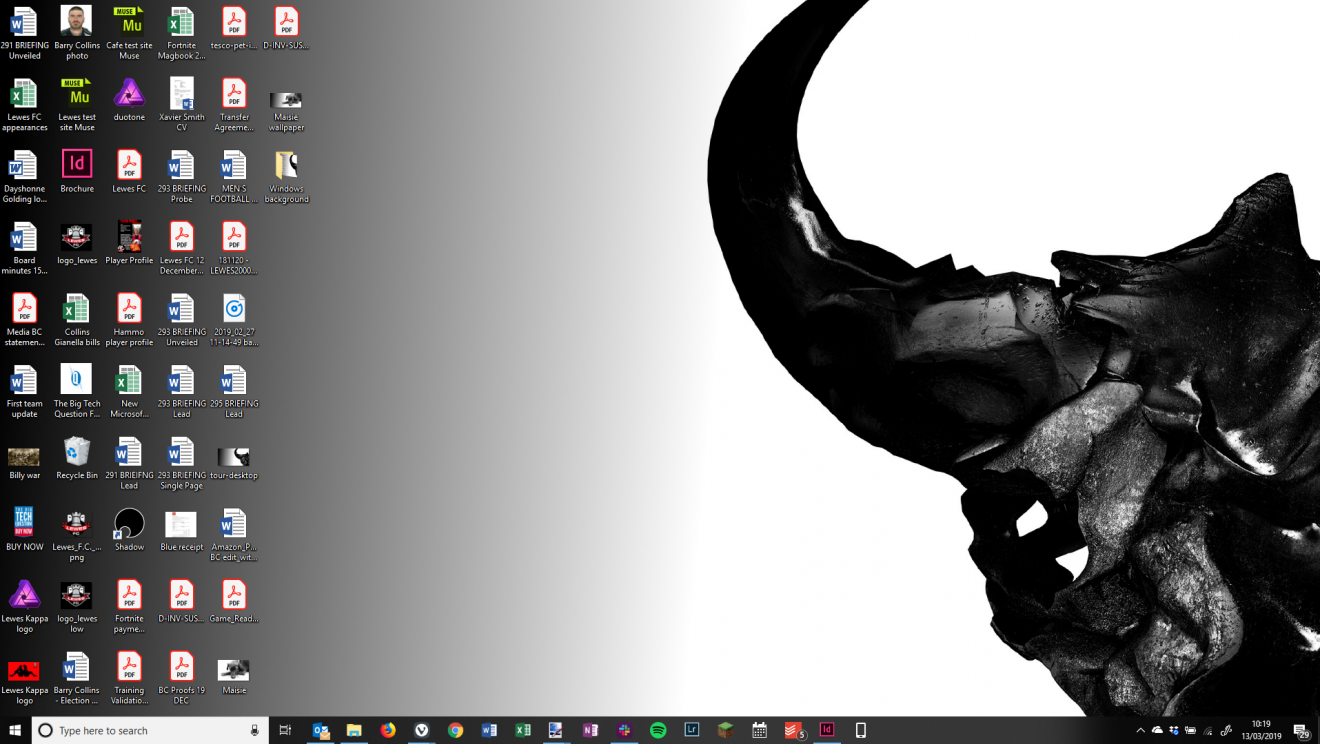
Fed up of looking at the same, tired desktop? How about swapping your boring background for a bold black-and-white image that will still let you see the icons on your desktop? Here, then, is how to make a stunning Windows wallpaper.
Related: How do I create the perfect phone wallpaper with Midjourney AI?
What you will need to make our Windows wallpaper
- Some art software, such as the free Paint.Net, which is the software we’re using in this tutorial
- An image where the subject is photographed on a plain (ideally white) background. It doesn’t matter if the right-hand side of the image falls out of the frame, but the left-hand side needs to be fully in the picture. Below are some samples of images that would work when creating this type of wallpaper.


How to make your Windows wallpaper
1. Extend the image
The first thing to do is to convert your image to black and white, if it isn’t already. To do this in Paint.Net, open the image and then select Adjustments > Black & White. You might want to tweak with the contrast and brightness once you’ve made the conversion.
When you’re happy with your black and white photo, click Image > Canvas Size. You should see a menu appear on top of your photo, as below:

There are a few settings we need to adjust here. Firstly, go to the Anchor section at the bottom of the window and click on the middle square in the right-hand column, as shown. This says we want to move our current photo to the right of the canvas we’re about to create.
Now untick the Maintain Aspect Ratio button at the top if it’s already pre-ticked. Finally, adjust the width of the canvas by typing a new number into the Width box.
Most computer screens are widescreen, whilst most photos are in the 4:3 ratio. So we want to extend the width of the image to match our screen. For most widescreens, extending the image by half its width again will suffice. In our case the image is currently 5,184 pixels wide and we’re going to make it 7,500 pixels wide (you don’t have to be super-precise).
When you click OK, you should find your image has been extended with a big white space on the left.
2. Add a gradient
We’re going to add a gradient to the left-hand side of our image for two reasons. First, because the text underneath Windows desktop icons is white, and if you have a white background, that’s very difficult to read. Second, because the gradient will draw the eye to the subject of your wallpaper on the right-hand side.
To add a gradient in Paint.Net, first select Layer > Add New Layer. (If you’re not familiar with art software, layers basically allow you to draw on top of the image below, without harming the original image.)
Now click on the Gradient tool (or you can select it by pressing G) and click on the far left of the screen. Hold the mouse button down and drag towards the middle of the image, until you’re roughly at the edge of your photo.
The image below will disappear, leaving only the gradient (as shown below).

Don’t panic, we’ll get the image back in a minute.
3. Merge the layers
Now we need to blend the gradient we’ve just created into the image below.
First, make sure you’ve got the Layers window open by pressing F7. In the window that appears, you should see one marked Layer 2. Right-click on Layer 2 and a little window should appear above your image, as shown below:

From the Blending Mode drop-down, select Multiply and you should now see your photo with the gradient over the top. You can fiddle with Opacity slider if you find the gradient is a little too dark. Click OK.
4. Save your image
When you’re happy with the image, you need to save it down. First, we need to ‘flatten’ the image – which is a techy term for collapsing all the layers into one.
Click Image from the menu at the top and then select Flatten.
Once that’s done, save your new image to somewhere convenient – such as the Pictures folder or the Windows desktop itself – and save it in the PNG format.
5. Set as desktop background
Finally, we need to set your newly created photo as the Windows wallpaper. Simply open the folder in which you’ve saved the image, right-click on the image’s icon and select Set as Desktop Background.
A second or two later, you should have the aforementioned stunning Windows wallpaper!

NOW READ THIS: What’s the easiest way to transfer photos from Android to a Windows PC?
Add Comment